Saturday 26 September 2009

Hantu-hantu di Indonesia

1. Kuntilanak


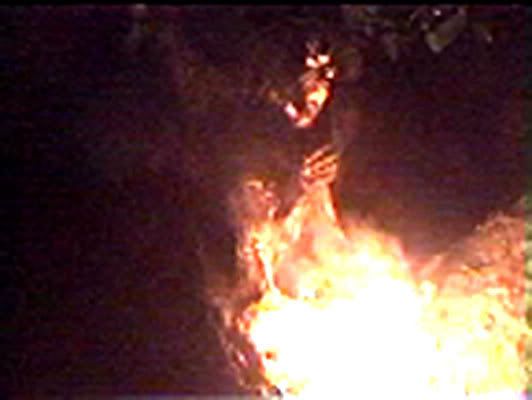
sosok kuntilanak digambarkan dalam bentuk wanita cantik. Kuntilanak digambarkan senang meneror penduduk kampung untuk menuntut balas. Kuntilanak sewaktu muncul selalu diiringi harum bunga kamboja. Konon laki-laki yang tidak berhati-hati bisa dibunuh sesudah kuntilanak berubah wujud menjadi penghisap darah. Kuntilanak juga senang menyantap bayi dan melukai wanita hamil. Dalam cerita seram dan film horor di televisi Malaysia, kuntilanak digambarkan membunuh mangsa dengan cara menghisap darah di bagian tengkuk, seperti vampir.Agak berbeda dengan gambaran menurut tradisi Melayu, kuntilanak menurut tradisi Sunda tidak memiliki lubang di punggung dan hanya mengganggu dengan penampakan saja. Jenis yang memiliki lubang di punggung sebagaimana deskripsi di atas disebut sundel bolong. Kuntilanak konon juga menyukai pohon tertentu sebagai tempat "bersemayam"


2. Sundel Bolong


Sundel bolong dalam mitos hantu Indonesia digambarkan dengan wanita berambut panjang dan bergaun panjang warna putih. Digambarkan pula terdapat bentukan bolong di bagian punggung yang sedikit tertutup rambut panjangnya sehingga organ-organ tubuh bagian perut terlihat. Dimitoskan hantu sundel bolong mati karena diperkosa dan melahirkan anaknya dari dalam kubur. Biasanya sundel bolong juga diceritakan suka mengambil bayi-bayi yang baru saja dilahirkan


3. Tuyul


Tuyul (bahasa Jawa: thuyul) dalam mitologi Nusantara, terutama di Pulau Jawa, adalah makhluk halus berwujud anak kecil atau orang kerdil dengan kepala gundul. Penggambaran lainnya yang tidak disepakati semua orang adalah kulit berwarna keperakan, bersifat sosial (dalam pengertian memiliki masyarakat dan pemimpin), serta bersuara seperti anak ayam. Tuyul dapat dipekerjakan oleh seorang majikan manusia untuk alasan tertentu, terutama mencuri (uang). Untuk menangkal tuyul, orang memasang yuyu di sejumlah sudut rumah karena tuyul dipercaya menyukai yuyu sehingga ia lupa akan tugas yang dibebankan pemiliknya. Kejadian tuyul dipercaya berasal dari janin orang yang keguguran atau bayi yang mati ketika lahir. Karena berasal dari bayi, karakter tuyul juga seperti anak-anak: gemar bermain (seperti laporan orang melihat sejumlah tuyul bermain pada tengah malam, dsb.).

4. Pocong


Penggambaran Pocong bervariasi. Dikatakan, Pocong memiliki wajah berwarna hijau dengan mata yang kosong. Penggambaran lain menyatakan, Pocong berwajah rata dan memiliki lubang mata berongga atau tertutup kapas dengan wajah putih pucat. Mereka yang percaya akan adanya hantu ini beranggapan, Pocong merupakan bentuk protes dari si mati yang terlupa dibuka ikatan kafannya sebelum kuburnya ditutup. Meskipun Pocong dalam film sering digambarkan bergerak melompat-lompat, mitos tentang Pocong malah menyatakan Pocong bergerak melayang-layang. Hal ini bisa dimaklumi,  sebab di film-film pemeran Pocong tidak bisa menggerakkan kakinya sehingga berjalannya harus melompat-lompat. Kepercayaan akan adanya hantu Pocong hanya berkembang di Indonesia, terutama di Jawa dan Sumatera. Walaupun penggambarannya mengikuti tradisi muslim, umat beragama lain pun ternyata dapat mengakui eksistensi hantu ini.

5. Genderuwo


Genderuwo adalah sejenis bangsa jin atau makhluk halus yang berwujud manusia mirip kera yang bertubuh besar dan kekar dengan warna kulit hitam kemerahan, tubuhnya ditutupi rambut lebat yang tumbuh di sekujur tubuh. Genderuwo terutama dikenal dalam masyarakat di Pulau Jawa (orang Sunda menyebutnya "gandaruwo" dan orang Jawa menyebutnya "gendruwo"). Habitat hunian kegemarannya adalah batu berair, bangunan tua, pohon besar teduh atau sudut-sudut yang lembab sepi dan gelap. Pusat domisili makhluk ini dipercaya berada di Hutan Jati Donoloyo, kecamatan Sloghimo, sekitar 60 km di sebelah timur Wonogiri, dan di wilayah Lemah Putih, Purwosari, Girimulyo, Kulon Progo sekitar 60 km ke barat Yogyakarta.

6. Wewe Gombel

Wewe Gombel adalah sebuah istilah dalam tradisi Jawa yang berarti roh jahat atau hantu yang suka mencuri anak-anak, tapi tidak mencelakainya. Konon anak yang dicuri biasanya anak-anak yang ditelantarkan dan diabaikan oleh orang tuanya. Wewe Gombel biasanya akan menakut-nakuti orang tua si anak atas sikap dan perlakuannya kepada anaknya sampai mereka sadar. bila mereka telah sadar, Wewe Gombel akan mengembalikan anaknya.
Menurut cerita, Wewe Gombel adalah roh dari seorang wanita yang meninggal bunuh diri lantaran dikejar masyarakat karena telah membunuh suaminya. Peristiwa itu terjadi setelah suami dari wanita itu berselingkuh dengan wanita lain. Sang suami melakukan hal itu karena istrinya tak bisa memberikan anak yang sangat diharapkannya. Akhirnya ia dijauhi dan dibenci suaminya lalu dikucilkan sampai menjadi gila dan gembel.
disebut Wewe gombel karena kejadian in terjadi di daerah Gombel, Semarang. Jika kita berkendaraan dari arah jatingaleh ke arah banyumanik, maka akan terlihat bekas iklan bir bintang. Di situlah konon letak lokasi wewe gombel berada. Beberapa orang menyebutkan bahwa lokasi tersebut adalah lokasi kerajaan hantu. Menurut cerita itu pula, hal itu yang menyebabkan sebuah hotel yang terletak di dalam lokasi bukit gombel menjadi bangkrut.

7. Leak
Dalam mitologi Bali, Leak adalah penyihir jahat. Le artinya penyihir dan ak artinya jahat. Leak hanya bisa dilihat di malam hari oleh para dukun pemburu leak. Di siang hari ia tampak seperti manusia biasa, sedangkan pada malam hari ia berada di kuburan untuk mencari organ-organ dalam tubuh manusia yang digunakannya untuk membuat ramuan sihir. Ramuan sihir itu dapat mengubah bentuk leak menjadi seekor harimau, kera, babi atau menjadi seperti Rangda. Bila perlu ia juga dapat mengambil organ dari orang hidup.

8. Rangda

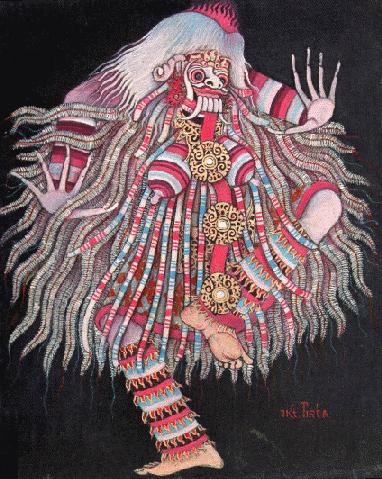
Rangda adalah ratu dari para leak dalam mitologi Bali. Makhluk yang menakutkan ini diceritakan sering menculik dan memakan anak kecil serta memimpin pasukan nenek sihir jahat melawan Barong, yang merupakan simbol kekuatan baik. Diceritakan bahwa kemungkinan besar Rangda berasal dari ratu Manendradatta yang hidup di pulau Jawa pada abad yang ke-11. Ia diasingkan oleh raja Dharmodayana karena dituduh melakukan perbuatan sihir terhadap permaisuri kedua raja tersebut. Menurut legenda ia membalas dendam dengan membunuh setengah kerajaan tersebut, yang kemudian menjadi miliknya serta milik putra Dharmodayana, Erlangga. Kemudian ia digantikan oleh seseorang yang bijak. Nama Rangda berarti juga janda. Rangda sangatlah penting bagi mitologi Bali. Pertempurannya melawan Barong atau melawan Erlangga sering ditampilkan dalam tari-tarian. Tari ini sangatlah populer dan merupakan warisan penting dalam tradisi Bali. Rangda digambarkan sebagai seorang wanita dengan rambut panjang yang acak-acakan serta memiliki kuku panjang. Wajahnya menakutkan dan memiliki gigi yang tajam.

9. Kuyang

Kuyang merupakan siluman berwujud kepala manusia dengan isi tubuh yang menempel tanpa kulit dan anggota badan yang dapat terbang untuk mencari darah bayi. Makhluk ini dikenal masyarakat di Kalimantan. Kuyang sebenarnya adalah manusia (wanita) yang menuntut ajaran ilmu hitam untuk mencapai kehidupan abadi. Pada siang hari, seorang kuyang akan menempuh hidup sehari-hari sebagaimana orang biasa, namun biasanya ia mengenakan pakaian jubah. Pada malam hari kuyang akan terbang untuk mencari darah bayi atau darah persalinan untuk dihisap sebagai sarana menambah kekuatan ilmunya. Orang yang melihat kuyang terbang biasanya melihatnya seperti burung besar.
Untuk menghadapinya korban perlu menggunakan sapu ijuk atau memukulkan perabot rumah tangga seperti panci atau wajan.

10. Palasik


Palasik menurut cerita, legenda atau kepercayaan orang Minangkabau adalah sejenis makhluk gaib. Menurut kepercayaan Minangkabau palasik bukanlah hantu tetapi manusia yang memiliki ilmu hitam tingkat tinggi. Palasik sangat ditakuti oleh ibu-ibu di di Minangkabau yang memiliki balita karena makanan palasik adalah anak bayi/balita, baik yang masih dalam kandungan ataupun yang sudah mati (dikubur), tergantung dari jenis palasik tersebut.
Ilmu palasik dipercayai sifatnya turun-temurun. Apabila orang tuanya adalah seorang palasik maka anaknya pun akan jadi palasik.
Pada umumnya palasik bekerja dengan melepaskan kepalanya. Ada yang badan nya yang berjalan mencari makan dan ada pula yang kepala nya yang melayang-layang mencari makan.

White Hacker

hacker2 jagoan..beberapa dari mereka juga cuman sebagai white hat hacker..

1.Jonathan James

James adalah orang Amerika, saat baru umur 16 taun dia dikirm ke penjara karena kelakuannya di dunia maya. Situs departemen pertahanan Amerika dibobol olehnya dan dia cuma bilang itu tantangan bagi dia dan merupakan suatu kesenangan tersendiri. NASA juga terkena dampak keisengan dia, James mencuri software NASA yang diperkirakan seharga $1.7 juta dollar AS. Sehingga NASA dipaksa untuk mematikan server dan sistemnya. Karena kelakuannya, dia juga tidak boleh menyentuh komputer selama 10 tahun. Tapi sekarang dia sudah di jalan yang benar dan bikin sebuah perusahaan keamanan di bidang komputer.

2.Adrian Lamo

Dia membobol New York Times untuk mendapatkan info personal dan beberapa security number dan membobol Microsoft. Dia akhirnya didenda $65.000 dollar US. Saat ini dia jadi pembicara di beberapa acara seminar.

3.Kevin Mitnick

Inilah legenda hidup yang saat ini benar-benar mantap dalam dunia hack.
Inilah kelakuan dia:
-Menggunakan Los Angeles bus transfer system buat mendapatkan tumpangan gatis
-Mengelabui FBI
-Hacking kedalam DEC system (Digital Equipment Corporation)
-Mendapatkan administrator positon dalam satu komputer IBM biar menang judi, karena adminnya yang punya laptop IBM tersebut
-Hacking Motorola, NEC, Nokia, Sun Microsystems dan Fujitsu Siemens systems
Dan masih banyak lagi kelakuan dia yang luar biasa.
seorang white hat hacker pun yang bernama Tsutomu Shimomura pun (ahli juga dia dan merupakan top 5 white hat hacker), dihack komputer systemnya, dan terjadilah perang luar biasa. Dia dilacak dan ditangkap oleh FBI dengan bantuan Tsutomu Shimomura yang melacak (tracking) lewat jaringan HP' yang dibawa ama Mitnick saat itu. Tapi sekarang dia sudah tobat dan menjadi seorang penulis buku, konsultan security, dan pembicara.

4.Kevin Poulsen

Juga dikenal dengan Dark Dante. Dia menghack database FBI. Selain itu dia juga menghack seluruh lines phone station karena Memang kemahiran dia menghack lewat phone lines. Saat ini dia jadi senior editor di Wired News, dan berhasil menangkap 744 penawaran sex melalui profiles Myspace.

5.Robert Tappan Moris


6. Karl Koch

Dia berasal dari hannover Jerman yang menamakan komputernya FUCKUP (First Universal Cybernetic-Kinetic Ultra-Micro Programmer). Dia melakukan beberapa keberhasilan dalam menghack pada kurun waktu 1985-1988. Dia juga seorang cocaine addict.
Dia berhasil membobol beberapa sistem militer AS dan menghack sebuah pusat tenaga nuklir AS pada jaman perang dingin dan hasil hack'annya dijual ke KGB (Agen Rahasia Uni Soviet). Dia ditemukan tewas pada tahun 1988, menurut info dia membakar tubuhnya sendiri, namun siapa tahu ini merupakan konspirasi tingkat tinggi antara US dan Soviet pada perang dingin.

Friday 25 September 2009

Design an Epic Fantasy Scene with Photoshop

iseng2 nyari tutor, ternyata ada tutor keren buat para pemanipulasi gambar, so enjoy :)


Design an Epic Fantasy Scene with Photoshop

Website Templates

In this tutorial we are going to create a photo manipulation inspired by Valhalla, one of Mariusz Karasiewicz`s works. He is an amazing artist and his work is absolutly stunning. I want to thank him for allowing me to write this tutorial.

Final Result


Note from Editor: This tutorial, while well explained, is intended for more experienced Photoshop users. If you’re new to Photoshop, please consider trying out School of Photoshop and other Photoshop Tutorials first!


Materials Needed:

Step 1: Create a new document

Go to File > New (Ctrl+N) to create a new canvas. Mine is 1700px wide by 2400px high at 300dpi.
Step 1

Step 2: Large Gothic Doorway

Open in Photoshop the Large Gothic Doorway image and use the Move Tool (V) to drag it into the document you are working in. Then go to Edit > Free Transform (Ctrl+T) and scale the image down to fit your canvas. Change the name of this layer to Large Gothic Doorway.
Step 2


Step 3: Apply the Sharpen Filter

To apply the sharpen filter, go to Filter > Sharpen > Sharpen.
Step 3


Step 4: Select the gate

Now we need to cut the floor and everything that is behind the gate. In the next steps we will put some nice clouds there. So, use the Pen Tool (P) to create a path along the gate. Then, with the Pen Tool still selected, right-click on your image, select Make Selection and click OK.
Step 4


Step 5: Put the selection in a new layer

Select the Rectangular Marquee Tool (M), right-click on your image, and select Layer via Copy. Now the selection is in a new layer. Later we will use this layer to create a clipping mask for the clouds layer.
Step 5


Step 6: Add the clouds

Open in Photoshop the clouds image and move it in your document using the Move Tool (V). Change the name of this new layer to clouds.
Step 6


Step 7: Create a Clipping Mask

Right-click on your clouds layer and select Create Clipping Mask. Now the clouds layer is using the layer directly beneath it (Layer 1) as a mask.
Step 7


Step 8: Mask the clouds layer

We don`t want the clouds to be at the bottom of our image. To fix that, make sure that you have the clouds layer selected and go to Layer > Layer Mask > Reveal All. Then select a black soft brush (B) with the diameter of 200px and mask the bottom part of the clouds layer. Take a look at the following image for reference.
Step 8


Step 9: Duplicate the clouds layer

To duplicate a layer, right-click on it and select Duplicate Layer (Ctrl+J). Use the Move Tool (V) to move this layer at the top of the gate. Then add a layer mask to this layer, select a black soft brush with the diameter of 200px and mask the bottom part of this layer. Take a look at the next image for reference.
Step 9


Step 10: The knight

Open in Photoshop the knight photo and use the Pen Tool (P) to cut the knight from the image. Then using the Move Tool (V), move the knight to the document you are working in. Also, change the name of this layer to knight.
Step 10


Step 11: Add a mask to the knight layer

Make sure that you have your knight layer selected. Then go to Layer > Layer Mask > Reveal All. Select a black soft brush with the diameter of 80px and mask the horse`s legs like I did.
Step 11


Step 12: Lights

Now we are going to create some lights and shadows for the knight layer. Go to Layer > New Adjustment Layer > Curves, make sure that the Use Previous Layer to Create Clipping Mask option is checked and click OK.
Use the settings from the next image for the curves. Then fill the layer mask with black using the Paint Bucket Tool (G), select a soft white brush with the diameter of 50px and paint with this brush on the mask to create some lights on the knight.
Step 12


Step 13: Shadows

Repeat the previous step to create some shadows on the knight. For the Curves layer use the settings from the next image.
Step 13


Step 14: The wings

Open the wings image in Photoshop. Then copy and paste the wings that you like into your document and put them on the knight`s back. Also, change the name of this layer to wings.
Step 14


Step 15: Adjustments for the wings layer

Go to Layer > New Adjustment Layer > Curves, make sure that the Use Previous Layer to Create Clipping Mask option is checked and make a curve like I did.
Then go to Layer > New Adjustment Layer > Brightness/Contrast and use 24 for the brightness and 38 for the contrast. I also painted with a black soft brush on this layer`s mask because some areas of the wings were too bright.
Step 15


Step 16: The shield

Open in Photoshop the Black Knight V image and use the Pen Tool (P) to cut the shield from the image. Then move it into your document using the Move Tool (V). Go to Edit > Free Transform, hold down the Shift key, scale the shield down and rotate it like I did. Change the name of this layer to shield.
Step 16


Step 17: The sword

Now it`s time to give to the knight a sword. Open in Photoshop the sword image, cut the one from the middle and move it in your document. Change the name of this layer to sword and put it beneath the knight layer. The knight is almost complete now.
Step 17


Step 18: Group all the knight`s layers

Hold down the Ctrl key and select all the knight`s layers. Then hit Ctrl+G to group them. Change the name of this group to knight.
Step 18


Step 19: Add a mask to the knight group

Make sure that you have the knight group selected. Then go to Layer > Layer Mask > Reveal All and paint with a black soft brush with the diameter of 50px and the opacity set to 60%. Take a look at the following image for reference.
Step 19


Step 20: Transform the knight group into a Smart Object

Right-click on the knight group and select Convert to Smart Object. Now the knight is in just one layer. If you want to edit the knight, double-click on the layer`s thumbnail. A new document will appear with all the knight`s layers. When you finish editing, save this new document and close it. Then the changes will be applied to the smart object. You can read more about smart objects on Veerle`s blog.
Step 20


Step 21: Add a shadow to the knight

Hold down the Ctrl key and click on the knight layer`s thumbnail. This will make a selection of the knight. Now create a new layer, fill it with black and go to Select > Deselect (Ctrl+D). Then go to Edit > Free Transform, right-click on the image, select Flip Vertical, move the layer at the horse`s legs and hit the Enter key.
Now go to Edit > Transform > Distort, hold down the Shift key and distort the shadow like I did. Take a look at the next image for reference.
Step 21
Next, go to Filter > Blur > Gaussian Blur and set the Radius to 2px. Then change the opacity of this layer to 50% and its name to shadow and put it beneath the knight layer.
Step 21 - b


Step 22: Add a gradient map to the knight layer

Click on the knight layer to select it, then go to Layer > New Adjustment Layer > Gradient Map, make sure that the Use Previous Layer to Create Clipping Mask option is checked and click OK. Then use the settings from the next image. The colors which I used to create the gradient (from left to right) are #252c2e, #26353c, #aabac2 and #d1dde2.
Then set the opacity of this layer to 40%.
Step 22


Step 23: Add some mist

Create a new layer, set the foreground color to #252c2e and the background color to #d1dde2 and go to Filter > Render > Clouds. Then hit Ctrl+Shift+F two or three times, to increase the contrast of the clouds.
Next, you will have to add three filters to this layer:
  • Noise (Filter > Noise > Add Noise)
  • Despeckle (Filter > Noise > Despeckle)
  • Diffuse (Filter > Stylize > Diffuse)
Now add a mask to this layer (Layer > Layer Mask > Reveal All), fill it with black using the Paint Bucket Tool (G), select a white soft brush with the diameter of 150px and the opacity 70% and paint with this brush on the mask, at the bottom of the image. Then change the name of this layer to mist.
Step 23


Step 24: Add some adjustments to the mist layer

Now we are going to create three adjustment layers:
  • Brightness/Contrast (Layer > New Adjustment Layer > Brightness/Contrast);
  • Gradient Map (Layer > New Adjustment Layer >Gradient Map) – the colors which I used are #161d1c, #322402, #6a5728, #fffbf3; also, set the opacity for this layer to 40%;
  • Color Balance (Layer > New Adjustment Layer >Color Balance).
Note: Every time you add these adjustment layers, make sure that you check the ‘Use Previous Layer to Create Clipping Mask’ option.
For each adjustment layer use the settings from the following image.
Step 24


Step 25: Rays

Open in Photoshop the Light Beams and Rays Brushes. You can use the Preset Manager (Edit > Preset Manager) for this. Then create a new layer (Ctrl+Shift+N), select the Brush Tool (B) and use this tool to draw some white rays. You can use a mask to remove some parts of this layer, if you want. Is not a must. Change this layer`s name to rays.
Step 25


Step 26: Add the feathers

Again, use the Preset Manager to open the feathers brush set which you have downloaded at the begining of this tutorial. Then use the Brush Tool (B) to draw some feathers. Put each feather in its own layer and use the Free Transform (Ctrl+T) to rotate them.
Step 26


Step 27: Final Adjustments

All we have to do now is to add some adjustment layers. You can create them from the Layer > New Adjustment Layer menu.
  • Curves - we will use the curves to create some rays. Use the settings from the next image. Then select a black soft brush with the diameter of 100px and the opacity 75% and paint with this brush some rays on the curves layer`s mask.
Step 27
  • Color Balance - set the opacity of this layer to 50%
Step 27
  • Brightness/Contrast - we will use the Brightness and Contrast adjustment layer to make the image darker on the edges. Use the settings from the following image. Then select a black soft brush with the diameter of 300px and the opacity 100% and mask the center of this layer.
Step 27
  • Photo Filter - use the color #5c6f85
Step 27
  • Brightness/Contrast - this time we will use the Brightness and Contrast adjustment layer to increase the brightness of our image`s center. Use the settings from the following image. Then fill this layer`s mask with black using the Paint Bucket Tool (G), select a soft white brush with the diameter of 300px and paint with this brush on the image`s center.
Step 27
  • Curves – we will use again the curves to make the image`s egdes darker. Use a black soft brush with the diameter of 200px to mask the center of this layer. We want the curves to affect only the edges of our image.
Step 27
  • Gradient Map - this is our last adjustment layer. To create the gradient use the colors #181a1b, #19262c, #3c4e57, #fffbf3. Set this layer`s opacity to 60%.
Step 27


Step 28: Add a quote

This step is optional. Select the Type Tool (T) and write a quote or whatever you want at the top of the image. I have chosed a quote which belongs to James R. Cook: "Do just once what others say you can’t do, and you will never pay attention to their limitations again." I have used the Trajan font to write this.

Final Result